We'll focus on IntelliJ here. Below is a brief run through of installation and some of the features we'll use when developing automated end-to-end tests. If you're new to programming and automated testing and you don't know what these features are that's ok. It'll become clear in time. For now installation and creating a basic Java project setup will be enough to consider yourself walking with an IDE.
If you haven't already installed Java follow the instructions here.
Installing IntelliJ
The community edition is free so if you're using it on your personal machine go with that. If you're using it in your work life you might need to get a licence and go for the Ultimate edition.
Creating a Java Project
Once you've installed open the application.
Select New Project
Select Gradle.
Leave Java selected and select Next.
Enter name and select your desired location.
And select Finish.
Once it builds it will look like this.
Structure, build file and gradle wrapper all included. Ready to develop our end-to-end test project.
If the build fails for some reason you can kick it off again by selecting gradle (look over to the right) and reload
By default the structure is as follows. A module named as per what you named the project. An src directory with a main module containing a java directory. And a test module containing a java directory. Our test classes will live under the test module inside the java directory. And the code and classes needed to perform the necessary steps in our tests will live under main under the java directory.
To create a new module, package or directory right click where you want it to reside and select new.
The .gradle directory is generated by gradle. The .idea is generated by IntelliJ. This will likely go into a .gitignore file, which we will talk about later, so that they are not committed to remote repositories.
The gradle directory is generated when we create a gradle project with IntelliJ. This is necessary to run gradle commands with ./gradlew. We'll see what this is used for later.
External libraries contain the library's we get from our dependencies.
Working With Code
To create a class right click on the directory or package you want to the class to be stored under. Select new and java class.
Now we'll have to enter a name and select the type.
Hit enter and your class will be created with the base structure.
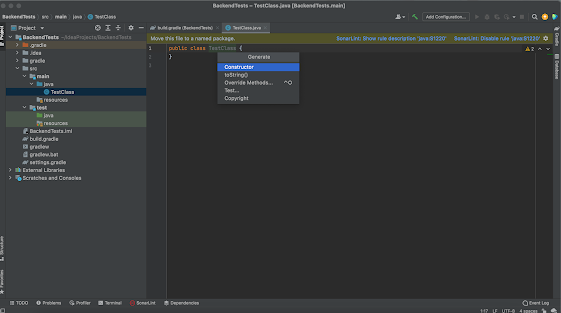
If you right click in the file editor and select generate we can IntelliJ can generate some boiler plate code for us.
If you add some data attributes/variables to the class and perform the same generate again you'll see even more options available.
IntelliJ will highlight syntax errors for you as you write code. You'll see a jagged red line appear where the error was made. Hover over it for more information.
Refactoring is a great little tool built into IntelliJ. Rename various parts of your class and IntelliJ will find all usages and update them as well. Extract duplicate code and IntelliJ will find all occurrences and look after those parts as well.
Sonarlint is a favourite plugin of mine that helps you write perfect code. Well visibly at least. Double tap shift for a search everywhere panel to open. Enter plugins.
Search the marketplace for sonarlint and install.
Now as you write code Sonarlint will provide useful tips that can help you write much cleaner code.
Running and Debugging Tests
To get this going for yourself you will need some working tests. You can use your own project of you can use this one just for sampling purposes.
Open a test class. Once the annotation @test is used from whatever test runner dependency you use(jUnit ot testNG for example) IntelliJ will provide you with options to run.
Top navigation menu
Or on the editor panel
You have options to run single tests or the entire class of tests.
Likewise we can run tests in debug mode if we need to figure out why something isn't working. Be it a bug in our tests or a bug in the application under test. Debug is what will assist you greatly here. Add a breakpoint, the red dot in the below image, to the line at which you want the test to stop. Right click the test and run the debug option.
When running in debug mode there's a feature called IntelliJ has has called Evaluate Expression that allows you to execute on the running program. You can call the methods of instantiated classes. to deep dive into reasons why your test might not be behaving as expected. This is a very powerful feature that will save you lots of time. To use, add a breakpoint, run a test in debug mode, when the test stops at the breakpoint double tap shift for search everywhere and enter evaluate expression.


Comments
Post a Comment